Showing posts with label Recipes. Show all posts

May 17, 2018

Pistachio Cupcakes {Recipe}


Hello everyone! Long time no see huh? Well, I'm not turning this into food blog, just popping in to post this amazing and seriously delicious recipe. Whenever I go to a party which requires me to bring food, I bring these. They never disappoint - always a hit and so easy to make. It's not mine so I can't claim it but I did come up with an awesome version of frosting so enjoy! The original recipe is from The Little Kitchen but I reduced sugar to 1/3 cup and frosting is almost like cheating on baking, it's that easy. Hope you like these!


  • CUPCAKES:
  • 1 1/2 cups unbleached, all-purpose flour
  • 1 1/2 teaspoons baking powder
  • 1/2 teaspoon salt
  • 3.4 ounce box of instant pistachio pudding
  • 1/2 cup (1 stick) unsalted butter, softened
  • 1/3 cup granulated sugar
  • 1 1/2 teaspoons pure vanilla extract
  • 1 teaspoon avocado oil
  • 2 large eggs
  • 1 egg white
  • 1/2 cup whole milk

  1.   1. Heat oven to 325 degrees F. Line a cupcake tin with cupcake liners.

  2. In a medium-sized mixing bowl, add flour, baking powder, salt and box of instant pudding. Whisk or mix together with a rubber spatula. Set aside.
  3. In the bowl of a stand mixer using the paddle attachment or a large mixing bowl with an electric hand mixer, cream butter and sugar on medium speed until light and fluffy. Add avocado oil and vanilla extract and mix until well blended. While still mixing, add eggs in one at time until completely incorporated. Scrape the sides of the bowl with a rubber spatula as needed
  4. Add dry ingredients and incorporate with a rubber spatula until most of the dry ingredients are moistened. This step takes seconds and it’s okay if there is unincorporated flour. Add milk and mix with hand mixer or in your stand mixer using the paddle attachment on the lowest speed for 30 seconds. Scrape the sides and bottom of the bowl and mix for another 20 to 30 seconds. The cake batter should be smooth, and very thick except for the pistachios from the pudding.
  5. Fill cupcake liners with 1/4 cup of cake batter. Bake for 20 to 22 minutes or until a toothpick inserted into one of the cupcakes comes out clean. (If using a 3 Tablespoon cookie scoop to portion out cupcakes, bake for about 16 to 18 minutes.) Or you can make mini cupcakes as I did, filling them with a tiny melon scoop, or one teaspoon 
  6. This recipe makes 14 regular cupcakes or 32 mini cupcakes.


      FROSTING:   
     
     2.5 cups heavy whipping cream   

     1/2 cup of milk

     1 package of pistachio pudding.

   1. Combine whipping cream and pistachio pudding in a bowl of an electric mixer. Slowly start mixing on the lowest speed to incorporate the pudding. Once it has melted into the whipping cream, increase the speed to the highest and beat until it turns into thick cream. 

   2. Add up to 1/2 cups of milk to loosen up the frosting. You don't have to add the milk but the frosting will be very difficult to pipe.

    3. Cut a tiny hole in a gallon-size Ziplock bag. Place the Wilton 2D tip inside the bag pushing it out so half of it is still inside the bag. Place the bag with tip inside a large glass and transfer the frosting in to it. Gather all the frosting and push it toward the tip so there are no air pockets. Pipe the frosting on to your beautiful cupcakes in a circular motion, starting with the outer layer and going up. 
If you want to see how it works, HERE is a great video on how to pipe different types of techniques with one tip.

Enjoy your cupcakes and if you make them, tag me so I can see! 


July 27, 2017

Grandma's Chicken Noodle Soup {Recipe}


Okay guys, I don't want to brag but, my chicken noodle soup is the best I have ever had. I mean, it's like your grandma's chicken noodle soup. The one you want to eat on a cold snowy day or on a rainy Sunday afternoon. Even though it's summer, I still make it a lot. We love soups here! Plus, everyone who has tried my soup raved about how great it is and Sorry I don't do step by step photos but if you follow this you will get it! But don't forget my very important secret ingredient - dill! If you want to make sure it's absolutely amazing use homemade chicken stock. Nothing  in the world will substitute the flavor and richness of homemade broth.

Ingredients

Broth:
1 chicken quarter leg
1 carrot
1 celery stick
1 small onion


Soup:
2 carrots
2 celery sticks
1 large onion
broth
chicken leg cut
1 green onion
small dill bunch
small cialntro bunch
1/4 tsp garlic powder
2 tbsp olive oil
8 oz small dutch egg noddles

How To Make Broth
Put all the ingredients into a large 5 qt pot and cover it with water. Bring it to rapid boil and decrease to simmer. Keep it on lowest heat and simmer for at least one hour. I usually let it simmer for 2 hours and then let it rest another hour off the heat.


Soup
Dice carrots, onion and celery. Place 2 tbsp of olive oil into a cast iron Dutch oven and let it heat up over medium heat. Place all the diced vegetables and saute them on low-medium heat for 10-15 minutes, until tender. Add broth, chicken and noodles and stir. Bring to boil and reduce heat to medium and cook until noodles are tender (according to package instructions). Remove from the heat or the noodles will become soggy. Finely chop dill, cilantro and green onion and add to the soup. Add a little bit of the greenery now and then save some for garnish when you serve the soup. The greens are what makes this soup stand out. The combination of fatty and delicious chicken stock with fresh herbs makes this recipe a winner in a my book. Try it!


September 17, 2015

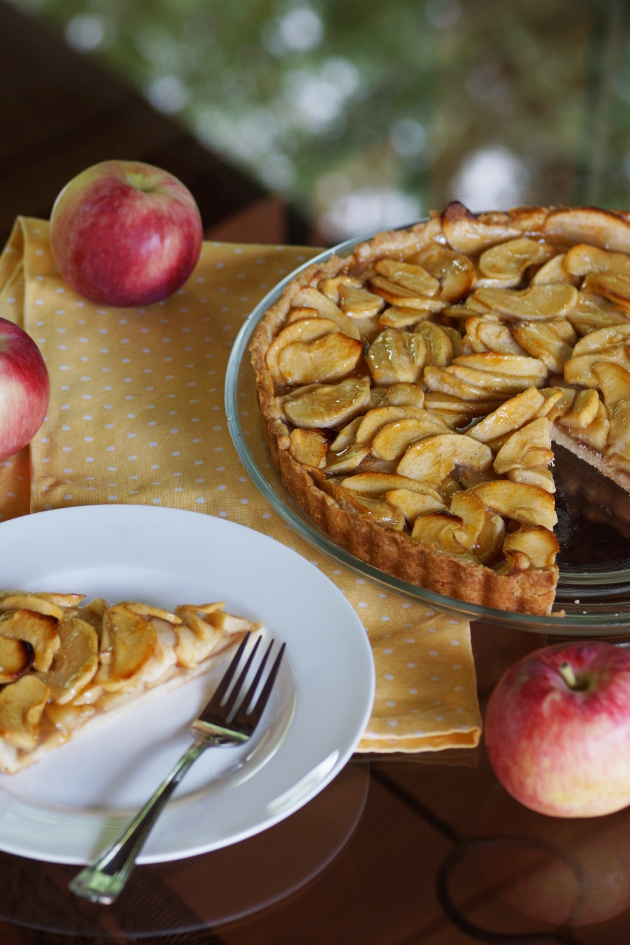
Rustic French Apple Tart {Recipe}


Whenever I ate apple tarts at bakeries, they were delicious but looked too intimidating to make. Then one time, I was all out of pie crust and had basic ingredients on hand. That one time was my lucky time because from now on I don't want to buy another crust dough, The dough is light and flaky while the apples are sweet and yummy. This apple tart is a true French perfection. 
Adopted from Alexandra's Kitchen 


Ingredietns

Tart Shell


1 1/4 cups flour, plus more for dusting
2 tablespoon sugar (optional — this is my addition. I love a little sugar in a tart shell.)
8 tbsp. unsalted butter, cubed and chilled, divided
1/4 tsp. table salt 

Apple Filling

7 apples* peeled and cored 
2 tbsp granulated sugar
2 tbsp light brown sugar
1/2 tsp cinnamon
1/4 cup corn starch
1 tsp lemons juice
1/2 cup apricot jam, (optional)
*I used Gala apples, and I needed about 6 for my 9-inch tart pan.

Process

1. Combine flour, sugar, 8 tbsp. butter, and salt and work together with your hands to incorporate butter into flour. Drizzle in 3 tbsp. ice­ cold water and work it until dough is moistened. Clump it together to make sure it's not falling apart. Transfer the dough to a work surface and form into a flat disk; wrap in a plastic wrap and refrigerate for 1 hour. Peel, core and slice the apples.
(Note: This can be made up to three days in advance, You can follow this tutorial for a real fancy lay out of the apples. I do not have that much time on my hands so I just dumped the cut apples into the tart. Shall we say it's a rustic apple tart.)
2. Unwrap dough and transfer to a lightly floured work surface. Using a rolling pin, flatten dough into a 13″ circle and then transfer to a tart pan with a removable bottom; trim edges; chill for 15 minutes.. 
(Note: It may be easier to remove the bottom of the tart pan and roll the dough directly on it. It was a little tricky getting the dough into the pan after it was rolled out)
3. Heat oven to 350º. Combine apples, sugars, corn starch, cinnamon and lemons juice in a bowl and toss it together to coat. Fill the tart with apple mixture and spread it out evenly. Bake for 45 minutes.
4. If you’re doing the apricot glaze: heat apricot jam in a small saucepan until warmed and loose; pour through a fine strainer into a small bowl and set aside. Transfer tart to a wire rack; using a pastry brush, brush top of tart with jam. Let cool completely before slicing and serving.


July 7, 2015

The BEST Strawberry Cake {Recipe}


I found the perfect white cake recipe! Honestly, everyone who tried this cake loved it and I can see why. It's light, fluffy, whipped cream frosting is perfect for summer and finished off with strawberries. I love how the flavors play together and the fact that it's not too sweet. I found it on Pinterest (where all great things can be found ha!) and pinned it on my board if you want to see the original (from Jenny Can Cook). I mean if her cake is so delicious, what else does she cook that's amazing? Check her out!


Ingredients:
  • 2 cups all purpose flour
  • 1 teaspoon baking powder
  • 1/2 teaspoon baking soda
  • 1/8 teaspoon salt

  • 1 1/3 cups low fat buttermilk
  • 1 teaspoon vanilla
  • 1/2 cup butter, softened
  • 1 1/2 cups sugar
  • 4 egg whites

  • 2 lbs. fresh strawberries, sliced
  • 1/4 cup sugar for strawberries
  • 2 cups heavy whipping cream 
  • 3 Tablespoons confectioner's sugar for whipping cream
Instructions:
  1. Preheat oven to 350° F.
  2. Grease two 9-inch round cake pans. Line bottoms with parchment paper & grease paper.
  3. Sift dry ingredients onto wax paper & set aside.
  4. Combine buttermilk & vanilla & set aside.
  5. Beat butter & sugar in a large bowl for one minute.
  6. Beat in egg whites one at a time.
  7. On low speed, alternate adding flour mixture & buttermilk mixture, ending with the flour.
  8. Spread into pans & bake 20-25 minutes.
  9. Cool 10 minutes and remove from pans to cooling rack.
  10. While cake is baking, put strawberries and sugar into a large bowl, stirring occasionally, mashing a little.
  11. Whip the cream with sugar until firm.
  12. Layer half the berries & juices on bottom cake & cover with cream.
  13. Place the second cake layer on top and cover with remaining berries & their juice. Cover the whole cake with remaining cream.


Lin Up: Full Time Mama

July 1, 2015

Pistachio Cake w/ Honey Butter Cream Frosting


A few months ago my husband order couple pounds of high quality nuts, among one of them were delicious unsalted pistachios. We ate about 4lbs of them already but I was trying to save the last bag for a special occasion cake. I've searched high and low for a good recipe of a pistachio cake but they are quite rare. I was first contemplating making this chocolate cake with pistachio buttercream, but than I loved how the pistachio cake layers would play with buttercream. And they sure did! I have to warn though - this cake is very rich and after eating a small slice, one must have the cardiologist on standby. ha!


The original recipe is from  Jar of Vanilla blog and followed it to a tee. It wasn't a hard cake to make but definitely took some time. 

Things I would change next time.
- reduce sugar by 1/2 in batter and 1/2 in frosting. 
- add a drop of green food coloring into the batter
- add pistachio extract for pop of pistachio flavor
- don't use vanilla extract

Ingredients
For the cake
  • 1½ cups ice-water
  • 1 cup shelled pistachios
  • 2½ cups cake flour (see notes)
  • ¾ cup all purpose flour
  • 1 Tablespoon baking powder
  • 1 teaspoon baking soda
  • a pinch of salt
  • 1 cup unsalted butter, softened
  • 1¾ cups sugar
  • 2 teaspoons vanilla extract
  • 1 large egg
  • 3 large egg whites, at room temperature
  • ¼ teaspoon cream of tartar
For the buttercream
  • 1½ cups sugar
  • ⅓ cup flour
  • 1½ cups milk
  • ⅓ cup heavy cream
  • 1½ cups unsalted butter, soft, cut into small pieces
  • 1 teaspoon vanilla extract
  • 3 Tablespoon honey

Instructions
Prepare the Cake
  1. Preheat the oven to 162 degrees C (325 degrees F)
  2. Grease three 9-inch cake pans. Line with parchment paper and grease again. Dust with flour
  3. Put some ice in a measuring cup. Add cold water (up to the 1 ½ cup mark) and set aside
  4. Pulse the pistachio in a food processor until coarse. Remove 2 tablespoons to a small bowl
  5. Grind the remaining pistachios until finely chopped.
  6. Combine the coarse and fine pistachios in a large bowl and whisk.
  7. Sift the flours, baking powder, baking soda, and salt on top of the ground pistachios. Whisk until combined and set aside.
  8. Using the paddle attachment of the stand-up mixer, cream the butter for 3 minutes. Add the sugar and vanilla and beat for another 3 minutes. Scrape down the sides and bottom of the bowl.
  9. Add in the egg and beat until just combined.
  10. Add the flour/pistachio mix to the batter in three additions, alternating with the ice water, mixing each time until just combined. Scrape down the bowl and mix on low speed for a few more seconds.
  11. In a separate medium sized clean bow, combine the egg whites and cream of tartar until soft peaks form.
  12. Gently fold egg whites into batter.
  13. If you have a kitchen scale, weigh batter (batter weight) = total weight – bowl weight.
  14. Divide batter among three cakes pans and smooth tops.
  15. Bake in preheated oven for 35 – 40 minutes. (don't over bake). Toothpick inserted into center should come out almost clean (just a few crumbs sticking to it).
  16. Allow cakes to cool down for 20 minutes
  17. Flip warm cakes onto cooling racks and let cool completely before frosting
  18. Remove parchment paper from bottoms
Prepare the buttercream
  1. Combine the flour, sugar, heavy cream and milk in a medium saucepan and whisk until smooth.
  2. Put saucepan on medium heat and whisk mixture continuously. You can remove whisk and start stirring with a wooden spoon.
  3. Stir until mixture thickens and starts bubbling.
  4. Pour hot mixture into the bowl of a standup mixer fitted with a paddle attachment and beat on high speed until it has completely cooled (about 10 minutes)
  5. Reduce speed to low and add butter, a few pieces at a time. Increase speed and beat for a few more minutes until light and fluffy
  6. Add honey and vanilla and beat again until combined.
Assemble the Cake:
  1. Level tops of cakes with a serrated knife.
  2. Place one layer on a cake board (top side up). Spread frosting onto the layer
  3. Place second later. Spread frosting onto the layer
  4. Place the final layer (bottom side up). Spread a thin layer of frosting all over the cake (crumb coating).
  5. Refrigerate cake for 30 minutes to set the crumb coat.
  6. After 30 minutes, evenly spread the remaining frosting on the sides and top of cake.
  7. Decorate with pistachios
Notes
*Cake flour is not readily available where I live, so here is the substitute I used: I used all-purpose flour. I removed 2 tablespoons of all-purpose flour for ever cup of cake flour required; in total I removed 5 ‘levelled’ tablespoons of flour. I added 5 ‘levelled’ tablespoons of corn-starch and sifted them together. Please note that this is a substitution only for the cake flour. The remaining ingredients, including the ¾ cup all-purpose flour, were used as is with no changes made to them).


April 24, 2015

Paleo Banana Almond Flour Muffins {Recipe}


When I was looking for a recipe that's gluten free and dairy free, it was hard to pick one. Pinterest is crawling with Paleo recipes raging from ingredients I've never heard of to cheating with butter. Although after reading a few of them and the comments, I think I found the best one. This recipe from Power Hungry blog is bomb dot com. I honestly did not expect them to rise and not to fall, or taste so fluffy.  By far, this the best paleo recipe yet and the only thing I changed, was adding almond extract. 


INGREDIENTS
  • 2-1/2 c almond flour or almond meal
  • 1/2  tsp baking soda
  • 1/2 tsp fine sea salt
  • 3 large eggs
  • 2 very ripe bananas
  • 2 tablespoons honey, agave nectar or maple syrup
  • 2 tablespoons coconut oil (melted) or vegetable oil
  • 1 teaspoon vinegar (white or cider)
  • Optional Flavorings: 1 teaspoon almond extract 


INSTRUCTIONS


Preheat oven to 350F. Line 12 cups in a standard 12-cup muffin tin with paper or foil liners.

In a large bowl whisk the almond flour, baking soda and salt (whisk in any dried spices or herbs at this point, if using).

In a small bowl, whisk the eggs, banana, honey, oil and vinegar (add any extracts or zest at this point, if using).

Add the wet ingredients to the dry ingredients, stirring until blended. Fold in any optional stir-ins, if using.

Divide batter evenly among prepared cups.

Bake in preheated oven for 18 to 20 minutes until set at the centers and golden brown at the edges. Move the tin to a cooling rack and let muffins cool in the tin 30 minutes. Remove muffins from tin.


BLOG DESIGN BY BELLA LULU INK